Logging Tickets |
|

To log a ticket in Revelation helpdesk:
Click on the Log a Ticket button in the masthead area at the top of the page. (It's the second button in the nav.) This will bring up the New Ticket box:
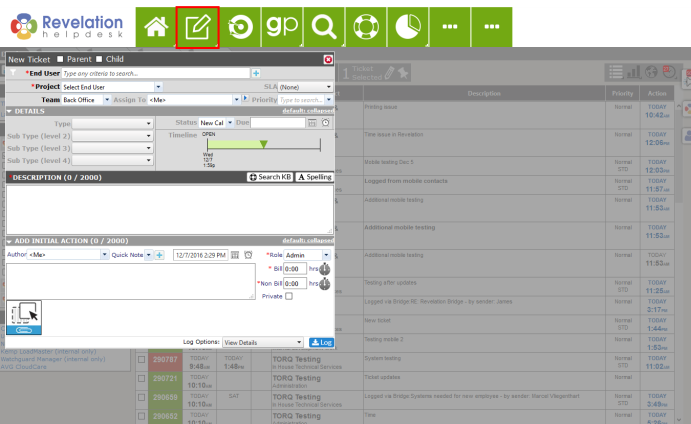
Any field with a red asterisk (*)is a required field.
- End User*
- Project
- Description
*If Client/End User Dropdowns is enabled in the Admin Area, the Client Name is required rather than the End User.
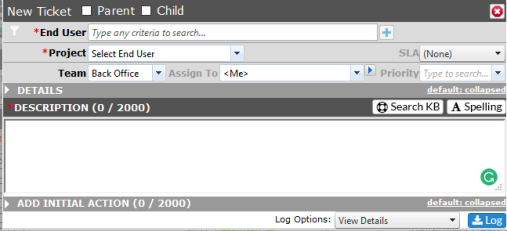
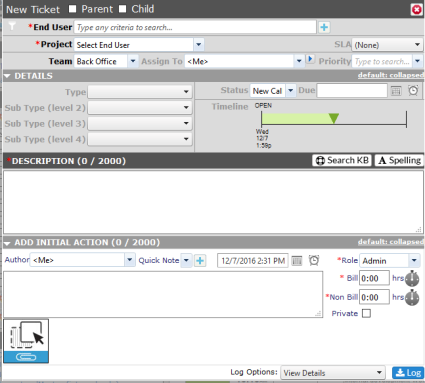
| Log a New Ticket - options collapsed | Log a New Ticket - options open |
 |
|
NOTE: If Automatic Spell Checking is enabled, the Spelling button will not be visible.
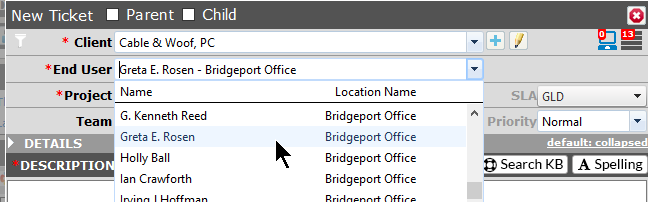
Simply begin typing the name in the End User field on Log a Ticket and a list of matches from the database will appear. Select the appropriate match, and Revelation will auto-populate the information in the ticket.
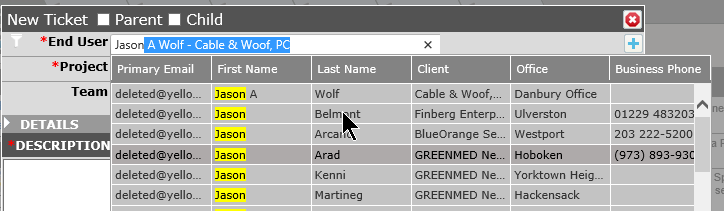
If Client/End User Dropdowns is enabled in the Admin area, your search will provide a list of clients in the drop down. You can then select the End User once the client is selected.
To ensure the data is complete, the following information is needed:
| New Ticket - Parent/Child | If the ticket is to be a Parent ticket, or the Child to an existing Parent ticket, check the appropriate box. Otherwise, leave blank. | ||||
| Client Type Filter |
Select the Client Type from the drop down. Multiple items can be checked or unchecked. If the selection is your default, click on Set as default at the bottom of the list.
|
||||
| End User (REQUIRED) |
If the asterisk is at End User, and the Client field is not showing, you will be able to type in the contact's name. All matching clients will be available in a drop down for selection.
When the Client is selected, this field will auto-populate with the client contact specified within the company set up. |
||||
| Client | If the End User is not the initial drop down, select the appropriate client from the pull down. You will be able to type any portion of the client name in the client box, and a list of clients matching that text will appear in the drop down | ||||
| Project (REQUIRED) |
The Primary project will auto-populate the field. Any other projects are available via the pull down. If the client has only one project, it will auto-populate the field.
|
||||
| SLA | If Service Level Management is active, Multiple SLAs can be assigned to the project, the default SLA will be visible and other options will be in the drop down. If not active, only the default SLA will be available. | ||||
| Assign To |
By default, the ticket is automatically assigned to the person logging the ticket. This will show as <Me> in the drop down.
This can be easily changed. Select the appropriate individual or group from the pull down. If the ticket needs to be assigned to more than one individual or group, click the arrow next to the pull down, and hold down the Ctrl key to assign multiple staff. |
||||
| Priority | The priority refers to the response time for responding to the ticket. This is set in the Admin area and can be part of a Priority Set specific to the client and/or project. | ||||
| Details Area | |||||
| Type/Sub Type |
A ticket type and sub type are required prior to closing a ticket.
Note: If Ticket Types and Sub Types is disabled in the Admin area, this will not be visible. |
||||
| Status | Based on the Ticket Status set up on the Admin Tab under Ticket Settings-Status. | ||||
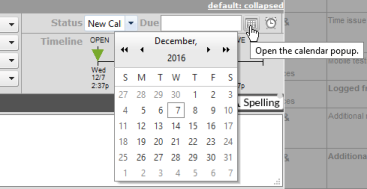
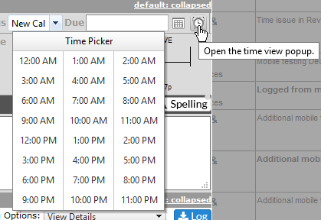
| Due |
If an SLA is selected, the Due Date will automatically update. If you need to change the date, type in the new date or use the calendar down. If the time needs to be changed, click on the clock and choose the closest hour on the time picker drop down; you can adjust the minutes if needed by highlighting the zeros after the colon and type in the appropriate minutes. |
||||
|
|||||
| Timeline | Gives a visual status of the milestones for a ticket based on the Service Level (SLA) assigned for the project, or if a manual due date is added. | ||||
| Description (REQUIRED) |
Fill in with a brief description of the issue (Quote request for block of time, Client called, staff cannot see server).
NOTE: There is a limit of 2,000 characters for the Ticket Description area. |
||||
| Add Initial Action |
Initial Ticket Action is a more detailed description of the problem and any initial diagnostics. Each action can have billable or non-billable time associated with the action, if this option is turned on. Default billable time is set to your company standard via Default Billable Time by Team in the Admin tab under Ticket Settings-Configuration-Action Note Configuration.
NOTE: There is a limit of 1,000 characters for the Initial Action area
Note: If you have Service Level Management activated, adding notes to the Initial Ticket Action field meets the Respond by date and time. If your help desk isn't supposed to alter Respond By times, this section MUST remain blank and be filled in by a technician to meet SLA requirements. If you don't use SLAs, the project has no SLA associated or you do not have the SLA module, this is not a factor and the fields are not required. Core users do not have this feature available. |
||||
| Author | <Me> is the default - this is the person logging the ticket. Different Authors can be selected from the drop down if you are logging the ticket for another end user. | ||||
| Quick Note |
Prewritten action notes available to Admins or Super Admins. If you are not authorize to add a Quick Note, this will not be visible.
If a Quick Note is not available, and you are authorized to add one, you may click on the add link to the right of the drop down to add a new Quick Note. |
||||
| Date/Time | Date and time the ticket is logged. Can be altered if needed, and if activated in Admin area. | ||||
| Role | The default role for the user logging a ticket will appear in the pull down. If the user has more than one role or if the Author is changed, the appropriate role can be selected from the pull down. | ||||
| Billable/Non-Billable Time | "Real" time is used in Revelation rather than decimal time; therefore 1:30 is 1 hour 30 minutes, not 1 hour 18 minutes. However, time can be entered in either format. If 1.5 is entered, it will revert to 1:30. | ||||
| Private | If checked, the information in the Action Note will not be visible to the client either on the Self Service Interface or when sent a report. | ||||
| Log Options Drop Down | Select the option or options from the drop down. If this is how you wish to have your tickets log all the time, click on Set as default
|

Once all the necessary information is completed for logging a ticket, click on Log at the bottom right of the screen. This will keep the ticket in an opened status unless otherwise specified. If the ticket is assigned to you or a group you are a member of, the ticket will appear on your home page.


